Rio is a brand new GUI framework designed to let you create modern web apps with just a few lines of Python. Rio’s goal is to simplify web and app development, allowing you to focus on what matters most instead of getting stuck on complicated user interface details.
Rio follows the core principles of Python that we all know and love. Python is supposed to be simple and compact — and so is Rio. Rio-UI empowers pure Python development: In Rio-UI, you can write everything, from the underlying logic to visual components and layouts, entirely in Python.
The aim of this article is to introduce you to Rio and provide you with a list of pros and cons when compared to established python frameworks by showing you how to build a Rio app.
Rio’s core features
Full-Stack Web Development: Rio handles front-end and backend for you. In fact, you won’t even notice they exist. Create your UI, and Rio will take care of the rest.
Python Native: Rio apps are written in 100% Python, meaning you don’t need to write a single line of CSS or JavaScript.
Modern Python: We embrace modern Python features, such as type annotations and asynchrony. This keeps your code clean and maintainable, and helps your code editor help you out with code completions and type checking.
Python Debugger Compatible: Since Rio runs on Python, you can connect directly to the running process with a debugger. This makes it easy to identify and fix bugs in your code.
Declarative Interface: Rio apps are built using reusable components, inspired by react, flutter & vue. They’re declaratively combined to create modular and maintainable UIs.
Batteries included: Over 50 built-in components based on Google’s Material Design.
Instant reloading: When code is written in the IDE, changes are immediately updated in the UI, allowing for real-time observation.
Open Source & Free forever
How Rio works
Rio doesn’t just serve HTML templates like you might be used to from frameworks like Flask. In Rio you define components as simple dataclasses with a React/Flutter style build method. Rio continuously watches your attributes for changes and updates the UI as necessary.
    import rio

    class MyComponent(rio.Component):
        clicks: int = 0

        def _on_press(self) -> None:
            self.clicks += 1

        def build(self) -> rio.Component:
            return rio.Column(
                rio.Button('Click me', on_press=self._on_press),
                rio.Text(f'You clicked the button {self.clicks} time(s)'),
            )

    app = rio.App(build=MyComponent)
    app.run_in_browser()
Notice how there is no need for any explicit HTTP requests. In fact there isn’t even a distinction between frontend and backend. Rio handles all communication transparently for you. Unlike ancient libraries like tkinter, Rio ships with over 50 built-in components in Google’s Material Design. Moreover the same exact codebase can be used for both local apps and websites.
Limitations
Please keep in mind that Rio is brand new and therefore is just getting started building its community. Hence, its community size is relatively small when compared to established frameworks.
Due to a wider range of use cases it comes with slightly longer learning curve compared to more popular frameworks like Streamlit. Rio’s 100% python philosophy comes with a completely new python lay outing system that will be new to you.
Rio is already proving its usefulness across a range of applications, from internal company tools like dashboards, CRUD applications, and forecasting tools, to personal websites such as portfolios and blogs. Notably, even the Rio website itself is built using Rio.
Hands on Dall-E Project

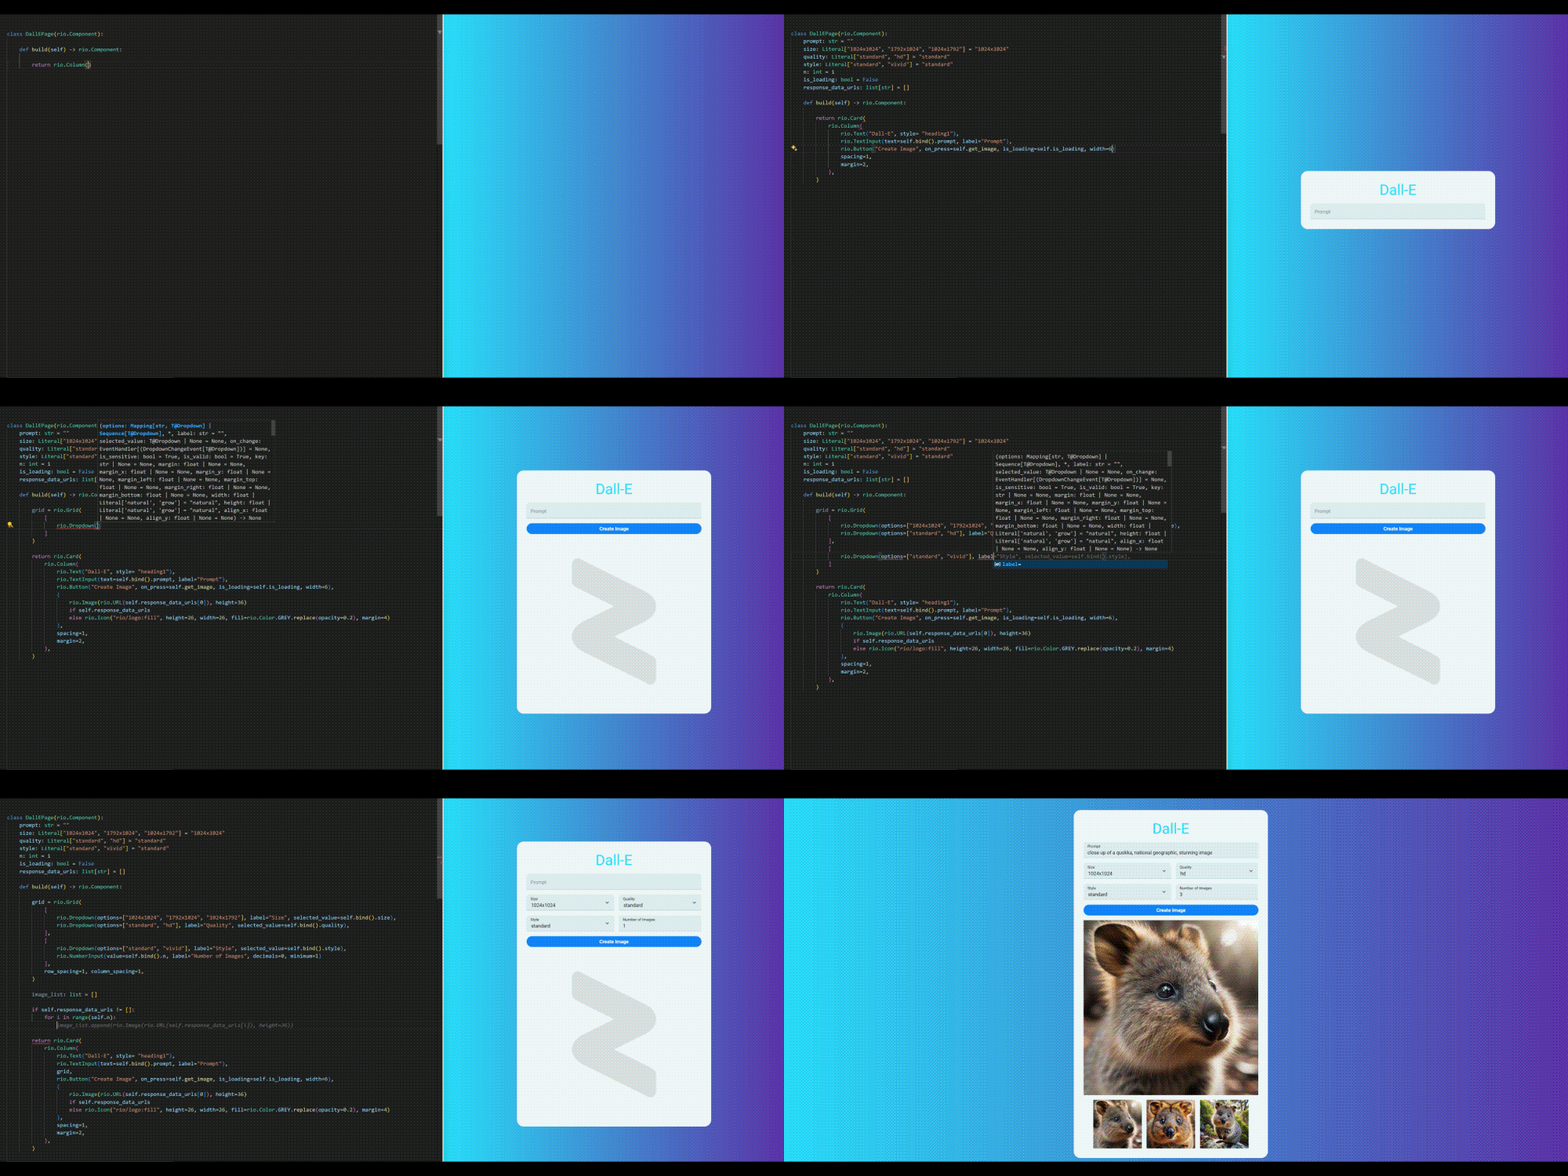
Dall-E example gif by author
First install the rio library using pip:
pip install rio-ui
Rio comes with a very helpful command line utility to help you out. It establishes the project structure, theme, app, and related components. Create a new project in one short command:
rio new
After setting up the project, we can begin to create our Dall-E WebApp. We will use the OpenAI API to generate images based on a prompt, where you can specify the size, quality, style and number of images to generate. Therefore I’ll break down the code into three parts:
Component, where all the core functionality is implemented
Page, where the the background and layout is defined (in this basic example you can add it to the component as well)
App, where the OpenAI client is created and attached to the app
Dall-E Component
Rio is similar to frameworks like React and Flutter, where you define components as simple dataclasses with a build method. The build method returns a Rio component that represents the UI. The get_image method is an asynchronous method that fetches images from the Dall-E API.
The attributes required for OpenAI’s client.images.generate are essential for the image generation process.
prompt represents the textual input provided by the user to generate images.
size specifies the dimensions of the output images.
quality defines the desired quality level of the generated images.
style indicates the visual style preference for the generated images.
n determines the number of images to generate based on the provided prompt. Since OpenAI’s dall-e-3 model only generates one image compared to dall-e-2. A loop is used to generate n images and store them in response_data_urls.
response_data_urls stores the URLs of the generated images.
is_loading is used to indicate whether the image is being generated.
Let’s break down the code:
build method:
A grid is configured by passing a list of dropdowns to the rio.Grid, with statebindings like self.bind().ATTRIBUTE. The generated images are stored in image_list by passing the URLs into rio.Image. The rio.Card component is used to create a card containing the UI elements. This card features a column that includes a heading, a text input for the prompt, dropdowns for selecting size, quality, and style, a number input for specifying the number of images, a button to create the images, an image preview, and a row that displays the generated images.
get_image method:
The get_image method is an asynchronous function designed to fetch images from the Dall-E API. Initially, it sets the is_loading attribute to True to signal that image generation is in progress. It then uses the OpenAI client to fetch the images, storing the URLs of the generated images in the response_data_urls. Once the process is complete, the is_loading attribute is set to False, indicating that the image generation has finished. This attribute also controls the display of a loading indicator on the button during the image generation process.
    import rio
    import openai
    from typing import Literal

    class DallEComponent(rio.Component):
        prompt: str = ""
        size: Literal["1024x1024", "1792x1024", "1024x1792"] = "1024x1024"
        quality: Literal["standard", "hd"] = "standard"
        style: Literal["standard", "vivid"] = "standard"
        n: int = 1
        is_loading: bool = False
        response_data_urls: list[str] = []

        def build(self) -> rio.Component:

            grid = rio.Grid(
                [
                    rio.Dropdown(options=["1024x1024", "1792x1024", "1024x1792"], label="Size", selected_value=self.bind().size),
                    rio.Dropdown(options=["standard", "hd"], label="Quality", selected_value=self.bind().quality),
                ],
                [
                    rio.Dropdown(options=["standard", "vivid"], label="Style", selected_value=self.bind().style),
                    rio.NumberInput(value=self.bind().n, label="Number of Images", decimals=0, minimum=1)
                ],
                row_spacing=1, column_spacing=1,
            )

            image_list: list = []

            if self.response_data_urls != []:
                for i in range(self.n):
                    image_list.append(rio.Image(rio.URL(self.response_data_urls[i]), height=10, width=10))

            return rio.Card(
                rio.Column(
                    rio.Text("Dall-E", style= "heading1"),
                    rio.TextInput(text=self.bind().prompt, label="Prompt"),
                    grid,
                    rio.Button("Create Image", on_press=self.get_image, is_loading=self.is_loading, width=6),
                    (
                        rio.Image(rio.URL(self.response_data_urls[0]), height=36)
                        if self.response_data_urls
                        else rio.Icon("rio/logo:fill", height=26, width=26, fill=rio.Color.GREY.replace(opacity=0.2), margin=4)
                    ),
                    rio.Row(*image_list, spacing=1, align_x=0.5, align_y=0.5),
                    spacing=1,
                    margin=2,
                ),
            )

        async def get_image(self) -> None:

            self.is_loading = True
            await self.force_refresh() # Force a refresh to update the UI

            if self.prompt == "":
                self.response_data_urls = []
                self.is_loading = False
                return

            try:
                for _ in range(self.n):
                    response = await self.session[openai.AsyncOpenAI].images.generate(
                        model="dall-e-3", prompt=self.prompt, size=self.size, quality=self.quality
                    )
                    assert isinstance(response.data[0].url, str)
                    self.response_data_urls.append(response.data[0].url)

            finally:
                self.is_loading = False
Dall-E Page
In this straightforward example, you could also move the background and layout to the DallEComponentcomponent. However, to provide a complete overview, we will create a page that represents the entire content. The DallEPage consists of a rectangle with a linear gradient fill and a DallEComponent as its content. As you can see, no CSS and HTML is needed for styling and layouting. The DallEComponent is centered by setting align_x=0.5 and align_y=0.5. The margin attribute is used to create space around the component. Check out Rio’s documentation for more information on styling and layouting components.
    import rio
    from .. import components as comps

    class DallEPage(rio.Component):

        def build(self) -> rio.Component:
            return rio.Rectangle(
                content=comps.DallEComponent(
                    width=40,
                    align_x=0.5,
                    align_y=0.5,
                    margin=2,
                ),
                fill=rio.LinearGradientFill(
                    (rio.Color.from_hex("01dffd"), 0),
                    (rio.Color.from_hex("5d32ad"), 1),
                ),
            )
Dall-E WebApp
Since rio new has already created the app, the next step is to attach the OpenAI client to it. The on_app_start function, called when the app starts, creates the OpenAI client and attaches it to the app. The app is then initialized with the DallEPage as the main page.
    import rio
    from .. import pages

    OPENAI_API_KEY = "YOUR OPENAI KEY"  # Replace this with your OpenAI API key

    def on_app_start(app: rio.App):
        # Create the OpenAI client and attach it to the app
        app.default_attachments.append(openai.AsyncOpenAI(api_key=OPENAI_API_KEY))

    # Create the Rio app
    app = rio.App(
        on_app_start=on_app_start,
        name="DallEApp",
        build=rio.PageView,
        pages=[
            rio.Page(
                page_url="",
                build=pages.DallEPage,
            ),
        ],
    )
Use the following command to run the app:
rio run
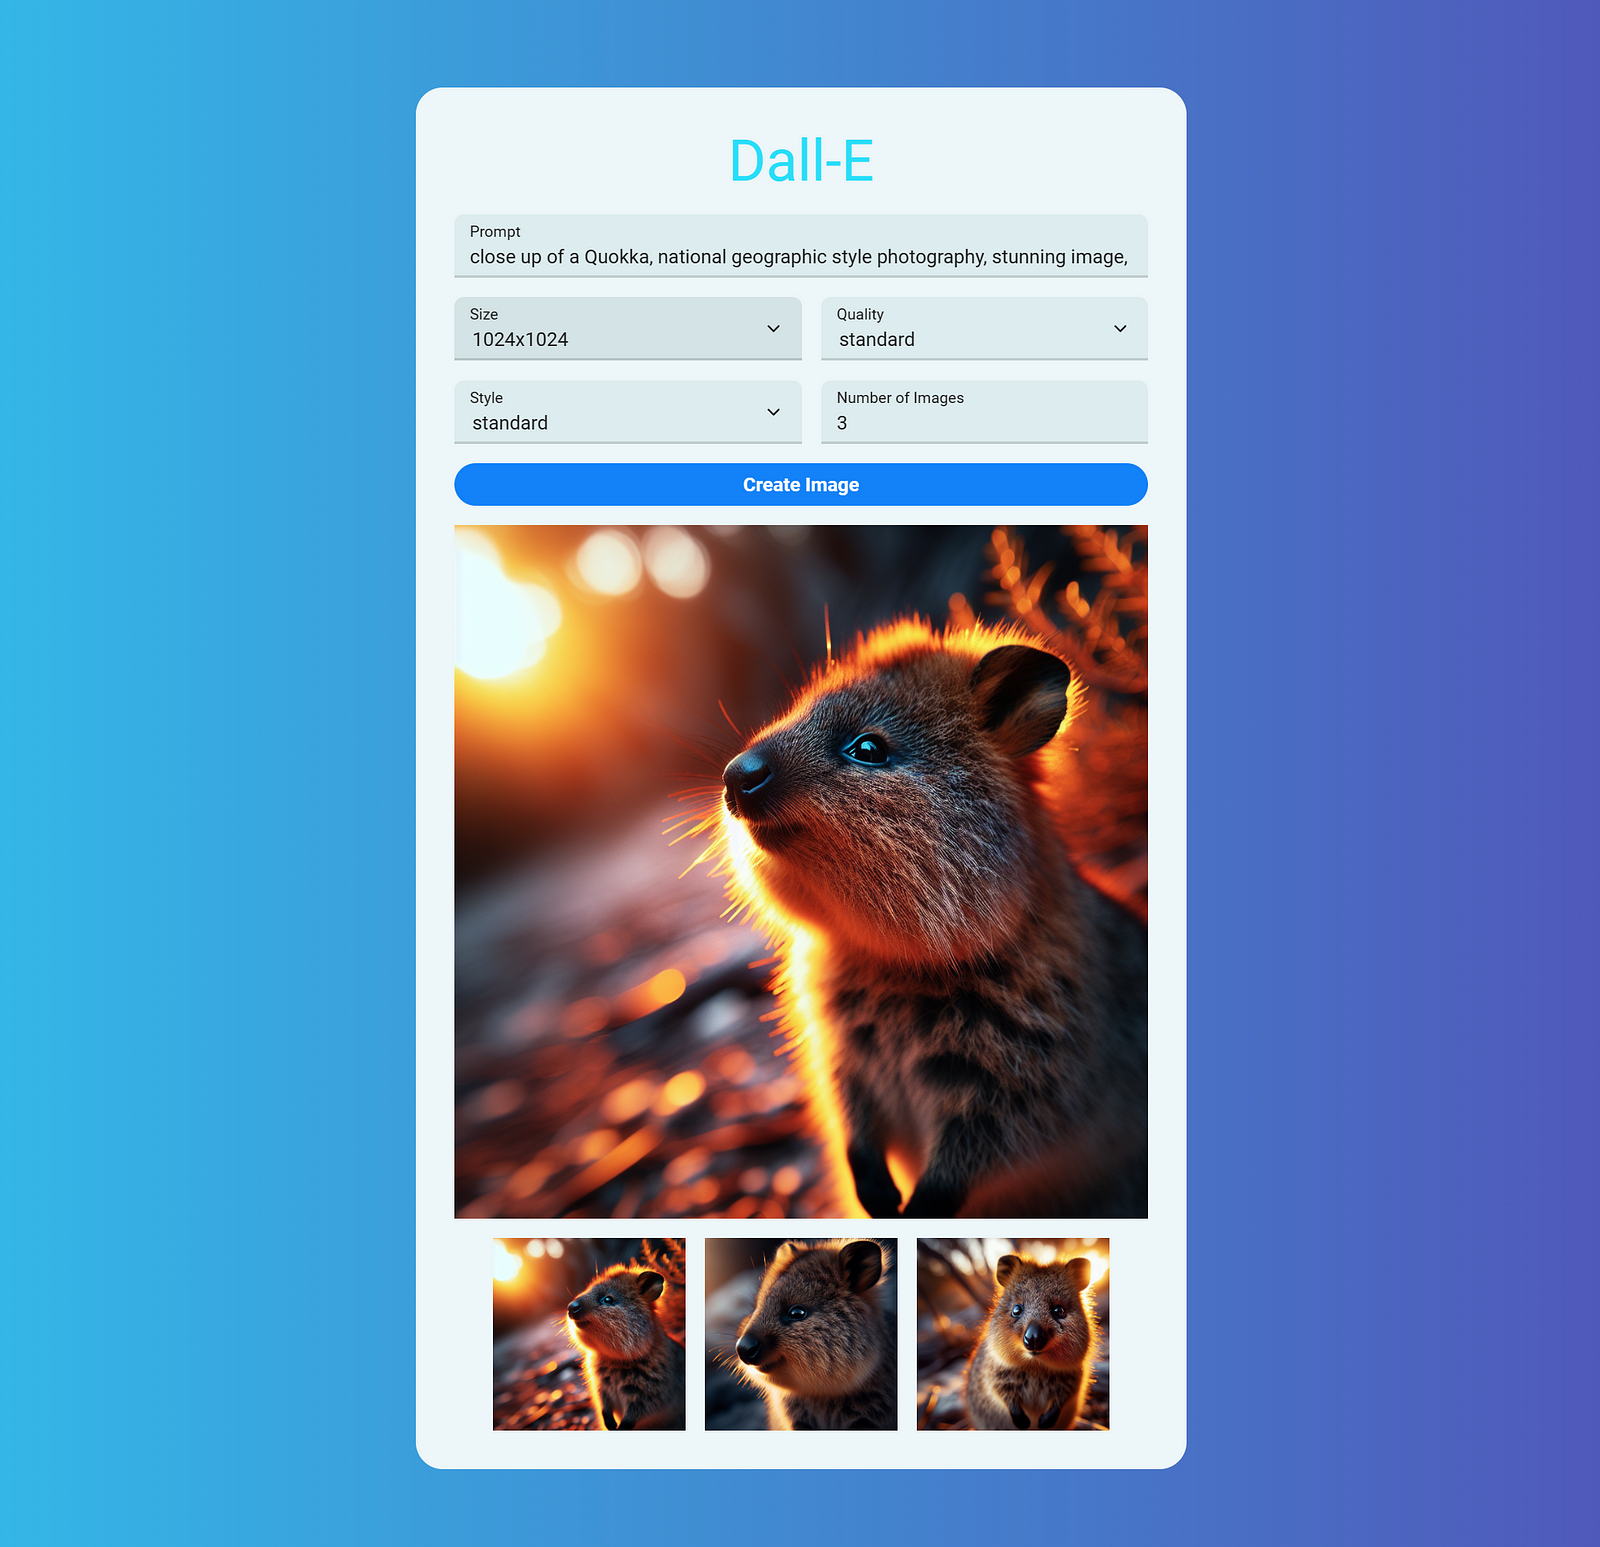
This will start the app and open it in your default browser. You can now interact with the Dall-E WebApp to generate images based on your prompts.

image of Dall-E example by author
Conclusion
Rio is a great choice for quickly and easily creating user interfaces with Python. It enables you to build powerful Python apps while maintaining full control over the internal state, and it simplifies testing and deployment. As a brand-new platform, it offers numerous opportunities for community contributions on GitHub. This example demonstrates just a small fraction of Rio’s capabilities. To learn more, follow the links below.
Ressources:
Documentation: https://rio.dev/docs
Website: https://rio.dev
Github: https://github.com/rio-labs/rio
